Execute Script on Shutdown (systemd)

To execute a script on every shutdown with systemd, create a service file with the content:
(on-shutdown.service)

[Unit]
Description=Will be executed on Shutdown

[Service]
Type=oneshot
RemainAfterExit=true
ExecStop=/usr/local/bin/youscript.sh

[Install]
WantedBy=multi-user.target

Put it inside the /etc/systemd/system folder, and enable it with:

systemctl deamon-reload
systemctl enable on-shutdown.service --now

Windows 10 Fall Creators Update (1709) destroys Linux Partitions

It was time for me to do the Fall Creator Update to Win10 1709 from my current Win10 1607 installation that i use on my dualboot system together with Fedora 27. And because it is a big update, i decided to do some preparations. I made backups of everything including the disk layout and updated with a flash drive like Microsoft described it here.
The Update itself worked pretty well, after i made sure that Windows is the default UEFI boot entry. No major error and the new Windows features worked immediately.
But: Now Linux was not able to boot.
Usually this is nothing special, it is well known that after big Windows Updates or Installations you have to reinstall GRUB (or whatever bootloader you are using). I am used to this in my >15years of Windows-Linux-Dualboot experience.
But this time it was special.

Lets see what happened… this was the partition layout before the Update (fdisk):

Gerät         Anfang      Ende  Sektoren  Größe Typ
/dev/sda1       2048    534527    532480   260M EFI-System
/dev/sda2     534528    567295     32768    16M Microsoft reserviert
/dev/sda3     567296 265443327 264876032 126,3G Microsoft Basisdaten
/dev/sda4  265443328 266364927    921600   450M Windows-Wiederherstellungsumgebung
/dev/sda5  266364928 268462079   2097152     1G Linux-Dateisystem
/dev/sda6  268462080 537234734 268772655 128,2G Linux-Dateisystem

Here the UUIDs of the Linux partitions with blkid:

/dev/sda5: LABEL="Fedora-Boot" UUID="5bed5e31-25a0-4446-8557-285098cc5812" TYPE="ext2" PARTUUID="826dae72-36a5-408a-89f6-8a16e2906fca"
/dev/sda6: UUID="64725166-1b67-4393-aa3c-b4097e3c869a" TYPE="crypto_LUKS" PARTUUID="3cc18e74-de0b-4e2e-a906-b7328136f737"

And here the partition layout after the Update (gdisk):

Number  Start (sector)    End (sector)  Size       Code  Name
1            2048          534527   260.0 MiB   EF00  EFI System Partition
2          534528          567295   16.0 MiB    0C01  Microsoft reserved ...
3          567296       264405092   125.8 GiB   0700  Basic data partition
4       264407040       265441279   505.0 MiB   2700
5       265443328       266364927   450.0 MiB   2700
6       266364928       268462079   1024.0 MiB  8300
7       268462080       537234734   128.2 GiB   8300

And the UUIDs of the Linux partitions with blkid (it is sdb because its from a booted live system):

/dev/sdb6: PARTUUID="826dae72-36a5-408a-89f6-8a16e2906fca"
/dev/sdb7: PARTUUID="3cc18e74-de0b-4e2e-a906-b7328136f737"

Here we can see that Windows Update shrinked the sda3 partition (Windows C: drive) and created a new Recovery Partition in the resulting space (even thought that we already have one). The Linux Partitions in the Partitiontable did not get touched, their start- and end-sector and PARTUUID are the same. The Linux stuff in the EFI partition is also still present and the Linux Boot entry in the UEFI is still there.
But the UUID, the label and the filesystem type of both partitions vanished. Those information belong to the Filesystem itself and are not part of the partitiontable, they are on the partition itself.
Windows Update destroyed the Linux Partitions. It did overwrite the Filesystem there. The 1GB partition had an ext2 filesystem of /boot and the 128GB partition was an LUKS encrypted partition. Both were wrecked and completely useless now. There was no way to even mount those partitions in a booted live system and no way to repair them (it always complained about brocken superblock and the BackUp superblocks didn’t work either), the data on them was completely lost.
The only way to repair it was with formatting those partitions again and restoring from full backups.

xdg-Standards or „Why isn’t the Default Applications for Images in Thunar the Default Application in catfish too“

If you have different file managers, or you are using some search tool like catfish, you will sooner or later try to open some file and find out that it doesn’t open with the application you want.
Every good file manager allows you to set the Default Application for a filetype and even Firefox has some configuration for that, so you can chose which application opens a downloaded file. But why do we have to do this? Why can’t we do this globally?

And the answer is: We actually can do it globally, but the applications just don’t follow some basic standards.

The basic standard we should follow in the Unix world is the xdg-standard. This means that the applications have some .desktop files in /usr/share/applications and/or ~/.local/share/applications. A .desktop file contains just some basic informations like which MIME types the application can open, it’s name, the path of the binary and some description.
A basic .desktop file can look like this:

[Desktop Entry]
Encoding=UTF-8
Version=1.0
Type=Application
NoDisplay=true
Exec=fehl %f
Name=feh
Comment=Simple Image Viewer

And we have some mimeapps.list which just says which application is the default for which MIME type. This file is in ~/.config/ and/or in /usr/share/applications/.
A mimeapps.list entry can look like this:

[Default Applications]
image/png=fehl.desktop
image/jpeg=fehl.desktop

The whole standard is straight forward and easy to understand. But there are some problems. The standard changed over time. For example the location of the mimeapps.list file was in ~/.local/share/applications in an older version of the standard and it’s in ~/.config/ now.
And the exec keys changed too. You see the ‚Exec=fehl %f‘ in the example above? The %f is a key for the filename. So if you would open a file in the file manager and this .desktop file is the default for that filetype, the file manager would execute ‚fehl /full/path/to/file.ext‘.
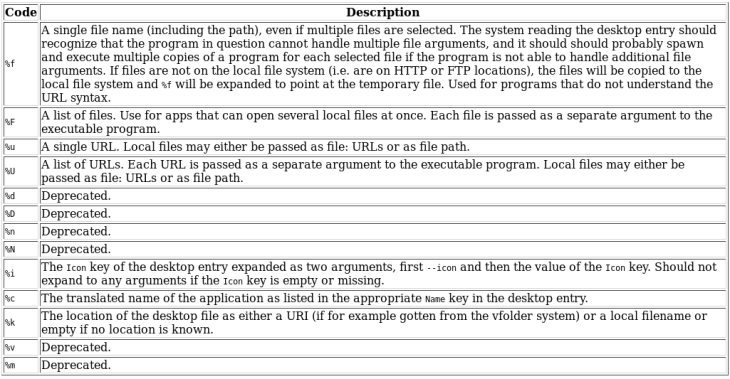
Lets look at the list of those keys:

Here we see all the Deprecated keys. All major file managers still support some or all of them. Xdg-open and catfish doesn’t support them.

All of those things can lead to some problems. If you set your Default Application for a filetype in a file manager like Thunar, it will create a .desktop file for it in ~/.local/share/applications and it will set it as a default in .config/mimeapps.list. This is nice, but Thunar does support the deprecated flags, so if you use them, this Default Application can’t be used by xdg-open or catfish.
It’s easy to deal with those problems. If some application needs the old path for mimeapps.list, just make a link to the other path and never use the Deprecated keys.

Using feh as the default image viewer/browser in a Tiling WM environment

I bought a new miniPC and use it as a HTPC with a nice Debian Installation and AwesomeWM.  Since everything on this system should be a bit lightweight i thought about trying feh (wich was already installed) as the default image viewer … and i have to say that it’s surprisingly nice. Who needs an user interface just for some back/forward/zoom buttons anyway? Just use the cursor keys for that.

Config files

feh comes with many command line options (just enter man feh) and it needs a lot of them to really look nice. So it makes sense to make a feh config-file (which basically is just a list of command line arguments which will get loaded by default). The global config files would be in /etc/feh and the user config files in ~/.config/feh. There are three possible config files, one is called ‚themes‘ (it is the file for default command line arguments), one is called ‚keys‘ for key bindings and one is called ‚buttons‘ for mouse button bindings.
Here is the config files i use:

~/.config/feh/themes
feh -B black \
-d \
-N \
--geometry 500x500 \
--auto-zoom

‚-b Black‘ means that the background is black (and not those ugly tiles), ‚-d‘ means that it draws the filename in the upper left corner, ‚-N‘ means that there is no right-click-menu.
‚–geometry 500×500‘ and ‚–auto-zoom‘ are actually very important for the use in Tiling WMs. Without those options, the zooming levels would get messed up every time when you change the size of the windows.

~/.config/feh/keys
save_filelist
toggle_fullscreen f

This config-file removes the strange behaviour of feh to save a filelist when you press F and binds it to toggle fullscreen instead. I am used to mpv and mplayer, so i expect F to be the button for fullscreen.

Create a script, so that you are always able to browse through all images in a directory

Currently, when you open a image with ‚feh filename.png‘, it would open just this one image and you would not be able browse through the whole directory. If you just execute ‚feh‘ in a directory, you will be able to browse through all images, but it starts with some random first one.
If you use ‚feh –start-at ./filename.png .‚ it would be the behaviour i want, but it’s a bit uncomfortable to type. So lets create a script in /usr/local/bin:

 /usr/local/bin/fehl
#!/bin/sh
#If no argument is given, just start feh
if [ -z ${1} ]; then
feh
exit
fi

#Set different seperator to avoid problems with spaces
IFS='
'

FPATH="$1"
FNAME="$(basename "$FPATH")"
DPATH="$(dirname "$FPATH")"
#If just filename and no path is given, assume that it's in current directory
if [ $DPATH=="" ]; then
DPATH="."
FPATH="./$FNAME"
fi
echo "DPATH = $DPATH"
feh --start-at $FPATH $DPATH

Make it executeable with ‚chmod +x /usr/local/bin/fehl‘ and now the command to open an image would be ‚fehl filename.png‘.

Make it your default image viewer in Thunar

To make it your default image viewer in Thunar, you would just right-click an image, chose „Open With“/“Open with other Application“, enter „fehl“ in the „Use a custom command“ field, check the „Use as default for this kind of file“ box and click Open.

Configure OpenVPN with the KDE connection editor

Some VPN providers like NordVPN already provide OpenVPN configuration files (*.ovpn). The configuration files for NordVPN can be downloaded here.

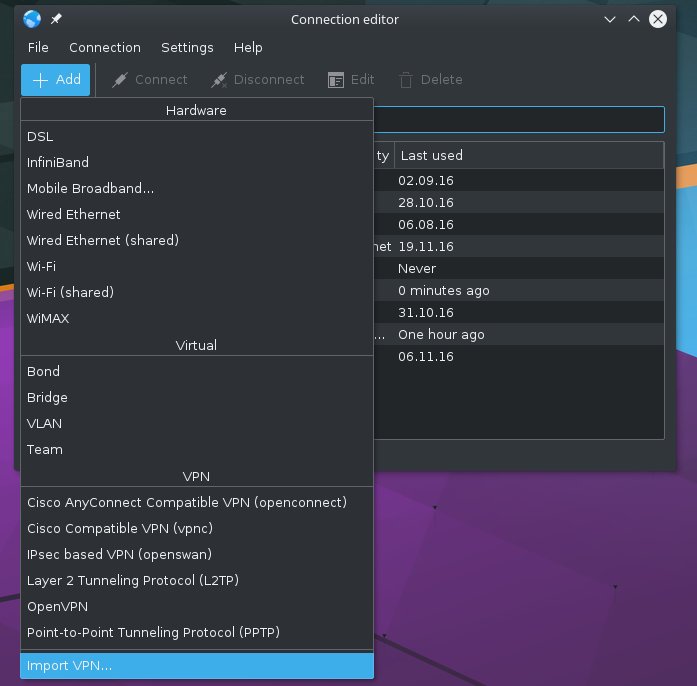
This is the easiest way to configure a VPN. Just download the .ovpn files. Open the KDE Connection Editor, Add a new Connection an click on “Import VPN”.
vpn1
Select one of the .ovpn files you downloaded, click OK, and if it asks you if you want to add the certificate, click Yes.
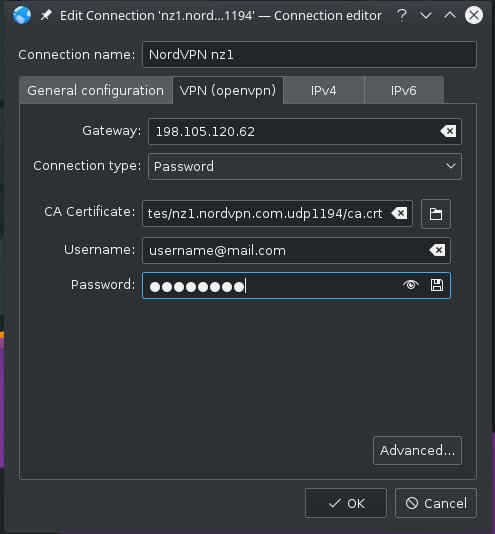
Edit the new VPN-Connection, change the connection name and enter Username and Password of your Account (if you can’t enter your password, click on the symbol to the right of the eye in the password-field, it maybe is set to “Ask for password every time”).
vpn2

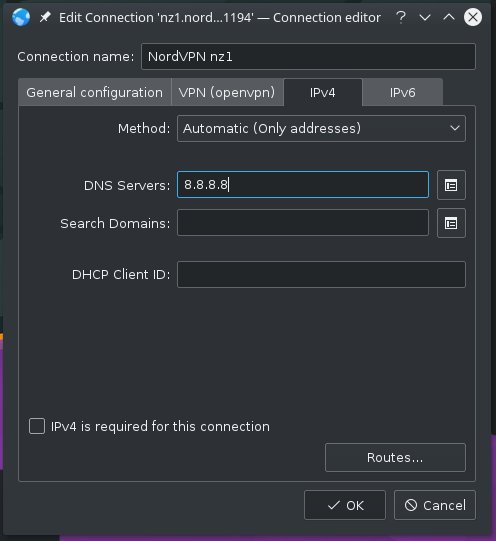
Sometimes you have to change the Settings in the IPv4 Tab too — this depends on your Distribution.
You will have to change Method to “Automatic (Only addresses)” and manually set the DNS-Server (8.8.8.8 is the Google DNS-Server, you may want to use another one).
vpn3

Now your VPN should work 🙂

Move Windows 10 to SSD on a UEFI Dualboot System with basic Linux Tools

I have Windows and Fedora in Dualboot on my Notebook. My 1TB HDD is not very fast, so i installed a new additional 275GB SSD and i moved Windows C:\ and Fedora Root to the SSD.
It was very tricky and i am sure that i will forget the commands i used in the future, so i will write it down.

This is the initial Partitioning of the HDD (/dev/sdb):

[root@fedora ~]# fdisk -l /dev/sdb
Festplatte /dev/sdb: 931,5 GiB, 1000204886016 Bytes, 1953525168 Sektoren
Einheiten: Sektoren von 1 * 512 = 512 Bytes
Sektorgröße (logisch/physikalisch): 512 Bytes / 4096 Bytes
E/A-Größe (minimal/optimal): 4096 Bytes / 4096 Bytes
Festplattenbezeichnungstyp: gpt
Festplattenbezeichner: 28542C82-BC46-4DFB-8B09-11B412039DEE

Gerät         Anfang       Ende   Sektoren  Größe Typ
/dev/sdb1       2048     411647     409600   200M EFI-System
/dev/sdb2     411648     444415      32768    16M Microsoft reserviert
/dev/sdb3     444416  265320447  264876032 126,3G Microsoft Basisdaten
/dev/sdb4  418920448  419842047     921600   450M Windows-Wiederherstellungsumgebung
/dev/sdb5  419842048  453396479   33554432    16G Linux Swap
/dev/sdb6  453396480  455493631    2097152     1G Linux-Dateisystem
/dev/sdb7  455493632  663111679  207618048    99G Linux-Dateisystem
/dev/sdb8  663111680 1953525134 1290413455 615,3G Microsoft Basisdaten

You can see that sdb2, sdb3 and sdb4 are the Windows Partitions and everything after it is Linux stuff. I already shrank /dev/sdb3 to an appropriate size (in Windows with the built in Disk Management Tool).
/dev/sdb8 is some ordinary NTFS-Partition with Music, Videos, Downloads, installed Applications etc.. This should stay on the HDD.

Preparing Windows

As i said before, i already shrank the Windows C:\ Partition on the HDD to an approriate size for the SSD (126GB). That is important because i will copy every Byte of the Partition with dd, it will have the same size after migrating to the SSD.

Additionally we have to disable the Windows Recovery Environment stuff on /dev/sdb4, because that thing is very unreliable and doesn’t behave well in Dualboot.
Boot Windows, start cmd with admin rights and type:

reagentc /disable

AND we need to create a Windows 10 Recovery Media (This is important! We need it to install the EFI-Bootloader.).

Create Partitions on the SSD

I use gdisk and fdisk to create and modify partitions in Linux.
Start gdisk as root on the SSD (here /dev/sda)

gdisk /dev/sda

Start with an empty GPT Partiton Table by pressing o, and create a EFI System Partition with 260MiB:
n -> (Partition Number) 1 -> (Startsector) Enter -> (Endsector) +270M -> (Type) EF00 (EFI System Partition)

Now we need to create 3 Partitions on the SSD with exactly the same Size (same amount of Sectors with the same size) , Type, Name AND Attributes as sdb2, sdb3 and sdb4 from the HDD.
Use gdisk -l /dev/sdb and fdisk -l /dev/sdb to get the proper information. If you want to know some Details (like the full Name and Attributes), press i in gdisk and enter the Partition Number. You will have to go to Expert Mode x in gdisk to change the Attributes. When you are done, write the Partition Table with w.

The Partition Table of the SSD now looks like this:

[root@fedora ~]# fdisk -l /dev/sda
Festplatte /dev/sda: 256,2 GiB, 275064201216 Bytes, 537234768 Sektoren
Einheiten: Sektoren von 1 * 512 = 512 Bytes
Sektorgröße (logisch/physikalisch): 512 Bytes / 512 Bytes
E/A-Größe (minimal/optimal): 512 Bytes / 512 Bytes
Festplattenbezeichnungstyp: gpt
Festplattenbezeichner: E3CAB581-554A-4657-974F-84E34627D6B4

Gerät         Anfang      Ende  Sektoren  Größe Typ
/dev/sda1       2048    534527    532480   260M EFI-System
/dev/sda2     534528    567295     32768    16M Microsoft reserviert
/dev/sda3     567296 265443327 264876032 126,3G Microsoft Basisdaten
/dev/sda4  265443328 266364927    921600   450M Windows-Wiederherstellungsumgebung
[root@fedora ~]# gdisk -l /dev/sda
GPT fdisk (gdisk) version 1.0.1

Partition table scan:
MBR: protective
BSD: not present
APM: not present
GPT: present

Found valid GPT with protective MBR; using GPT.
Disk /dev/sda: 537234768 sectors, 256.2 GiB
Logical sector size: 512 bytes
Disk identifier (GUID): E3CAB581-554A-4657-974F-84E34627D6B4
Partition table holds up to 128 entries
First usable sector is 34, last usable sector is 537234734
Partitions will be aligned on 2048-sector boundaries
Total free space is 270871821 sectors (129.2 GiB)

Number  Start (sector)    End (sector)  Size       Code  Name
1            2048          534527   260.0 MiB   EF00  EFI System Partition
2          534528          567295   16.0 MiB    0C01  Microsoft reserved ...
3          567296       265443327   126.3 GiB   0700  Basic data partition
4       265443328       266364927   450.0 MiB   2700

Format EFI System Partition and Clone Windows

We will format the EFI System Partition in FAT32:

mkfs.fat -F32 /dev/sda1

And clone the three Windows Partitions

dd if=/dev/sdb2 of=/dev/sdb2 bs=2M
dd if=/dev/sdb3 of=/dev/sdb3 bs=2M
dd if=/dev/sdb4 of=/dev/sdb4 bs=2M

Change GUID of Windows Partitions

Windows does access it’s Partitions by their UUID (Linux does the same on most Distributions, but in Linux we can just change /etc/fstab and reinstall GRUB — you can’t do this with Windows). If you don’t change the UUIDs, your system will either be not bootable or it will have some strange Bugs like a flickering screen.

List Partitions UUIDs

Start fdisk, on the HDD (fdisk /dev/sdb) go to expert mode (x) and print the partition table (p):

Expertenbefehl (m für Hilfe): p

Festplatte /dev/sdb: 931,5 GiB, 1000204886016 Bytes, 1953525168 Sektoren
Einheiten: Sektoren von 1 * 512 = 512 Bytes
Sektorgröße (logisch/physikalisch): 512 Bytes / 4096 Bytes
E/A-Größe (minimal/optimal): 4096 Bytes / 4096 Bytes
Festplattenbezeichnungstyp: gpt
Festplattenbezeichner: 28542C82-BC46-4DFB-8B09-11B412039DEE
Erster LBA: 34
Letzter LBA: 1953525134
Alternative LBA: 1953525167
LBA mit Partitionseinträgen: 2
Zugeordnete Partitionseinträge: 128

Gerät         Anfang       Ende   Sektoren Typ-UUID                             UUID                                 Name                         Attr.
/dev/sdb1       2048     411647     409600 C12A7328-F81F-11D2-BA4B-00A0C93EC93B AE710130-C001-42B2-8237-E688B102E731 EFI System Partition
/dev/sdb2     411648     444415      32768 E3C9E316-0B5C-4DB8-817D-F92DF00215AE 0310D237-5287-46A3-A41A-9409C78232FC Microsoft reserved partition
/dev/sdb3     444416  265320447  264876032 EBD0A0A2-B9E5-4433-87C0-68B6B72699C7 8A273F28-7483-4972-9D21-5EA1E3326EE9 Basic data partition
/dev/sdb4  418920448  419842047     921600 DE94BBA4-06D1-4D40-A16A-BFD50179D6AC EAA2D666-3BB9-410F-A1BD-B7CB5F140375                              RequiredPartiton
/dev/sdb5  419842048  453396479   33554432 0657FD6D-A4AB-43C4-84E5-0933C84B4F4F 731861D8-7515-4AAA-9907-51E3B3FECCE6
/dev/sdb6  453396480  455493631    2097152 0FC63DAF-8483-4772-8E79-3D69D8477DE4 7E2D59C3-C10E-427F-B9F2-A84031F9FA53
/dev/sdb7  455493632  663111679  207618048 0FC63DAF-8483-4772-8E79-3D69D8477DE4 7E869168-7C7D-427D-881D-89E18094F601
/dev/sdb8  663111680 1953525134 1290413455 EBD0A0A2-B9E5-4433-87C0-68B6B72699C7 B39A1F99-BD8D-4EAD-AB73-EBAF2101A5CF

We can’t have multiple partitions with the same UUID, so it’s best to delete them from the HDD.
You can BackUp the Partitiontable with dd if=/dev/sdb of=./path/to/backup.img bs=512 count=4 before doing that. When you fuck up, just restore it with dd if=./path/to/backup.img of=/dev/sdb bs=512 count=4 and your Windows Partitions will be back.

Copy the UUIDs of sdb2, sdb3 and sdb4 to some file and DELETE the 3 Partitions in fdisk wit d.

Now enter fdisk on the HDD, go to Expert Mode (x) and change the UUID (u) of sda2, sda3 and sda4 (SSD) to the ones you copied from the deleted sdb2, sdb3 and sdb4.

Note: This are the UUIDs (or GUIDs) of the Partitions. Every Filesystem has an UUID too, you can view them witk blkid.
The UUIDs of the three NTFS/FAT32-Filesystems on sda2, sda3 and sda4 are already the same as sdb2,sdb3 and sdb4, because dd copied the whole partition, including the UUID, Bootsector, Extended Attributes, etc.
If you want to change NTFS or FAT32 UUIDs, you need to do it with an hexeditor like hexedit /dev/sdb3. They are at the beginning of the partition.

Boot to Win10 recovery and install EFI-Bootloader

Boot the Windows 10 recovery media and open the command prompt in the Advanced screen.

Check if C:\ is your Systempartition from the SSD (cd /d C: and dir — if there is some Windows and Application folder, it should be correct).

Execute diskpart and enter sel disk 0 and list partition.

C:\Windows\system32>diskpart

Microsoft DiskPart-Version 10.0.14393.0

Copyright (C) 1999-2013 Microsoft Corporation.
Auf Computer: ACERNETBOOK

DISKPART> sel disk 0

Datenträger 0 ist jetzt der gewählte Datenträger.

DISKPART> list volume

  Volume ###  Bst  Bezeichnung  DS     Typ         Größe    Status     Info
  ----------  ---  -----------  -----  ----------  -------  ---------  --------
  Volume 1     C                NTFS   Partition    126 GB  Fehlerfre  Startpar
  Volume 2                      FAT32  Partition    260 MB  Fehlerfre  System
  Volume 3                      NTFS   Partition    450 MB  Fehlerfre  Versteck
  Volume 4         Data         NTFS   Partition    615 GB  Fehlerfre


DISKPART>

Volume 2 is our EFI System Partition (FAT32 and 260MiB), we will assign it  a Drive Letter and exit diskpart

DISKPART> sel vol 2

Volume 2 ist jetzt das gewählte Volume.

DISKPART> assign letter=v:

Der Laufwerkbuchstabe oder der Bereitstellungspunkt wurde zugewiesen.

DISKPART> exit

Datenträgerpartitionierung wird beendet...

C:\Windows\system32>

And install the Bootloader to the EFI Parition

bcdboot C:\Windows /s v: /f ALL

Reboot and Windows should start from the SSD.
Done 🙂
MIUI8, edit framework-res.apk and fix Roaming Indicator

MIUI doesn’t know all operators around the world, like bob, which is a brand of A1 Telekom Austria and uses their Network. Bob has the MNC 11 (Mobile Network Code) and  A1 has 1. MIUI does recognize that the MNC of the bob SIM Card is not the same as the network operator and thinks that it is Roaming and displays a R in the Status Bar.

To fix this, we need to tell MIUI that a MCC232MNC1 network for a MCC232MNC11 SIM card is in fact not roaming. These settings are in /system/framework-res.apk. Of course you need root for that and i will not explain how to pull/push system files from/to a android device, i will just explain how to edit the framework-res.apk.

You need 4 files from your device:
/system/framework/framework-res.apk
/system/framework/framework-ext-res/framework-ext-res.apk
/system/app/miui/miui.apk
/system/app/miuisystem/miuisystem.apk
And you need to install apktool.

First we install all 4 apks in apktool:

apktool if ./framework-res.apk
apktool if ./framework-ext-res.apk
apktool if ./miui.apk
apktool if ./ miuisystem.apk

Now we extract/decompile the framework-res.apk

apktool d ./framework-res.apk

It will create a directory ./framework-res where all files from the apk got extracted. Now we can edit the resource file.

We will add a new directory ./framework-res/res/values-mcc232-mnc11 and create a new file ./framework-res/res/values-mcc232-mnc11/arrays.xml which contains:

<?xml version="1.0" encoding="utf-8"?>
<resources>
<string-array name="config_operatorConsideredNonRoaming">
<item>23201</item>
<item>23209</item>
<item>23212</item>
</string-array>
</resources>

When we made all changes we need, we can repack/compile it again:

apktool b ./framework-res -o framework-res-new.apk

APKs are signed, so we can’t just use the new framework-res-new.apk, we need to replace resources.arsc of the ./framework-res.apk with the new one from framework-res-new.apk . APKs are basically just zip-files, so we can use zip/unzip utils for that. We will remove resources.arsc and ./framework-res-new.apk after that, because we don’t need it anymore.

unzip framework-res-new.apk resources.arsc
zip framework-res.apk "resources.arsc"
rm resources.arsc
rm framework-res-new.apk

Now replace the framework-res.apk from your device with our changed one. If you do this with adb, be sure to move it over the other one, with the correct permissions, DO NOT delete the framework-res.apk before doing that! Your device will crash instantly and be unbootable.

For example: The new framework-res.apk is in /sdcard/Download and you are in an adb shell on your device.

su
mount -o rw,remount /system
mv /sdcard/Download/framework-res.apk /system/framework/framework2.apk
chmod 644 /system/framework/framework2.apk
mv /system/framework/framework2.apk /system/framework/framework-res.apk

Now restart your device and the R for Roaming should be gone.

Flash MIUI8 to Xiaomi Redmi 3S with fastboot

If your Updater App on your Xiaomi isn’t working or you don’t trust it (maybe because your smartphone got shipped with Adware installed or isn’t behaving like it should), you can update it with fastboot.
You can download the Fastboot-ROM here. If  you are on Windows, you can use the Mi Flash Tool.

On Linux with already installed Android platform-tools it’s way easier

First make sure to Backup all your Data, because it will be erased, and download the Fastboot ROM for your device.

#Download Fastboot-ROM (this one is for Redmi 3S)
wget http://bigota.d.miui.com/V8.0.3.0.MALMIDG/land_global_images_V8.0.3.0.MALMIDG_20160805.0000.29_6.0_global_588e5c60af.tgz
#Extract it
tar xzvf land_global_images*.tgz

Now you need to connect your phone to your PC and boot it in Fastboot Mode (shut it down and press Power and Volume Down key simultaneously ).

Check if your bootloader is unlocked

fastboot oem device-info

It should output:

...
(bootloader)    Device tampered: false
(bootloader)    Device unlocked: true
(bootloader)    Device critical unlocked: false
(bootloader)    Charger screen enabled: true
(bootloader)    Display panel: 

If “Device unlocked: true”, you are ready to go. Flash the ROM with the sh-Script from the extracted archiv

cd *gloobal
./flash_all.sh

Install 2 different Styles on your Tileserver and Leaflet

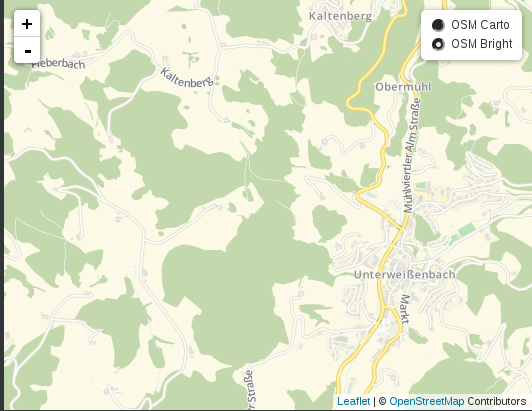
This is an example configuration on how to run two different map styles (OSMBright and openstreetmap-carto) on one renderd and leaflet server. For an instruction on how to install a tileserver with openstreetmap-carto and leaflet, see here, for instructions for OSMBright, click here.

osm-multiple-styles

renderd.conf

Each style has an own section with an own tiledir and URI. Make sure that both tiledirs exists and is owned by the user which runs renderd.

[renderd]
socketname=/var/run/renderd/renderd.sock
num_threads=4
tile_dir=/var/lib/mod_tile
stats_file=/var/run/renderd/renderd.stats

[mapnik]
plugins_dir=/usr/lib/mapnik/2.2/input
font_dir=/usr/share/fonts/truetype
font_dir_recurse=1

[default]
URI=/osm_tiles-carto/
TILEDIR=/var/lib/mod_tile-carto
XML=/usr/local/src/openstreetmap-carto-2.29.1/style.xml
HOST=localhost
TILESIZE=256
;HTCPHOST=proxy.openstreetmap.org
;** config options used by mod_tile, but not renderd **
;MINZOOM=0
;MAXZOOM=18
;TYPE=png image/png
;DESCRIPTION=This is a description of the tile layer used in the tile json request
;ATTRIBUTION=&copy;<a href=\"http://www.openstreetmap.org/\">OpenStreetMap</a> and <a href=\"http://wiki.openstreetmap.org/wiki/Contributors\">contributors</a>, <a href=\"http://opendatacommons.org/licenses/odbl/\">ODbL</a>
;SERVER_ALIAS=http://localhost/
;CORS=http://www.openstreetmap.org
;ASPECTX=1
;ASPECTY=1
;SCALE=1.0

[defaultbr]
URI=/osm_tiles/
TILEDIR=/var/lib/mod_tile
XML=/usr/local/share/maps/style/OSMBright/OSMBright.xml
HOST=localhost
TILESIZE=256
;HTCPHOST=proxy.openstreetmap.org
;** config options used by mod_tile, but not renderd **
;MINZOOM=0
;MAXZOOM=18
;TYPE=png image/png
;DESCRIPTION=This is a description of the tile layer used in the tile json request
;ATTRIBUTION=&copy;<a href=\"http://www.openstreetmap.org/\">OpenStreetMap</a> and <a href=\"http://wiki.openstreetmap.org/wiki/Contributors\">contributors</a>, <a href=\"http://opendatacommons.org/licenses/odbl/\">ODbL</a>
;SERVER_ALIAS=http://localhost/
;CORS=http://www.openstreetmap.org
;ASPECTX=1
;ASPECTY=1
;SCALE=1.0

The tiles in http://localhost/osm_tiles are now rendered with OSMBright and http://localhost/osm_tiles-carto with openstreetmap.carto.

Leaflet

<!DOCTYPE html>
<html>
<head>
<title>Full Screen Leaflet Map</title>
<meta charset="utf-8" />
<link
rel="stylesheet"
href="./leaflet.css"
/>
<style>
body {
padding: 0;
margin: 0;
}
html, body, #map {
height: 100%;
width: 100%;
}
</style>
</head>
<body>
<div id="map"></div>

<script
src="./leaflet.js">
</script>

<script>
var osmLink= '<a href="http://openstreetmap.org">OpenStreetMap</a>';

var osmUrlcarto = './osm_tiles-carto/{z}/{x}/{y}.png',
osmUrlbright = './osm_tiles/{z}/{x}/{y}.png',
osmAttrib = '&copy; ' + osmLink + ' Contributors';

var osmMAPcarto = L.tileLayer(osmUrlcarto, {attribution: osmAttrib}),
osmMAPbright = L.tileLayer(osmUrlbright, {attribution: osmAttrib});

var map = L.map('map', {layers: [osmMAPbright]}).setView([48.4394, 14.7703], 14);
var baseLayers = {
"OSM Carto" : osmMAPcarto,
"OSM Bright" : osmMAPbright
};
L.control.layers(baseLayers).addTo(map);
</script>
</body>
</html>